- Help Center
- Global
- Reporting
-
Global
-
Affordable Care Act (ACA)
-
Human Resources (HR)
-
Payroll
-
Time & Labor Management (TLM)
-
Tax Agency Management
- Alabama
- Alaska
- Arizona
- Arkansas
- California
- Colorado
- Connecticut
- Delaware
- District of Columbia - Washington D.C.
- Florida
- Georgia
- Hawaii
- Idaho
- Illinois
- Indiana
- Iowa
- Kansas
- Kentucky
- Louisiana
- Maine
- Maryland
- Massachusetts
- Michigan
- Minnesota
- Mississippi
- Missouri
- Montana
- Nebraska
- Nevada
- New Hampshire
- New Jersey
- New Mexico
- New York
- North Carolina
- North Dakota
- Ohio
- Oklahoma
- Oregon
- Pennsylvania
- Puerto Rico
- Rhode Island
- South Carolina
- South Dakota
- Tennessee
- Texas
- Utah
- Vermont
- Virginia
- Washington
- West Virginia
- Wisconsin
- Wyoming
Active Employees for Specific Dates Using Custom Filters
How to create a custom date filter on employee information report
Example below captures all the Active employees in the year 2023. Select TEAM > My Team > Employee InformationSelect COLUMNS filter (upper-right of screen)
Click the Custom tab in the Filters window
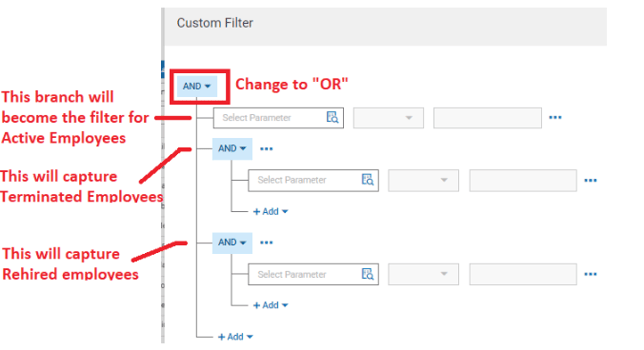
Click Add Custom Filter to create the following filter structure.
- Click the ADD option and select Operator.
- Click the bottom-most ADD option and select Operator again
- Change the top-most ADD operator from AND to OR.
- The filter should look like this:

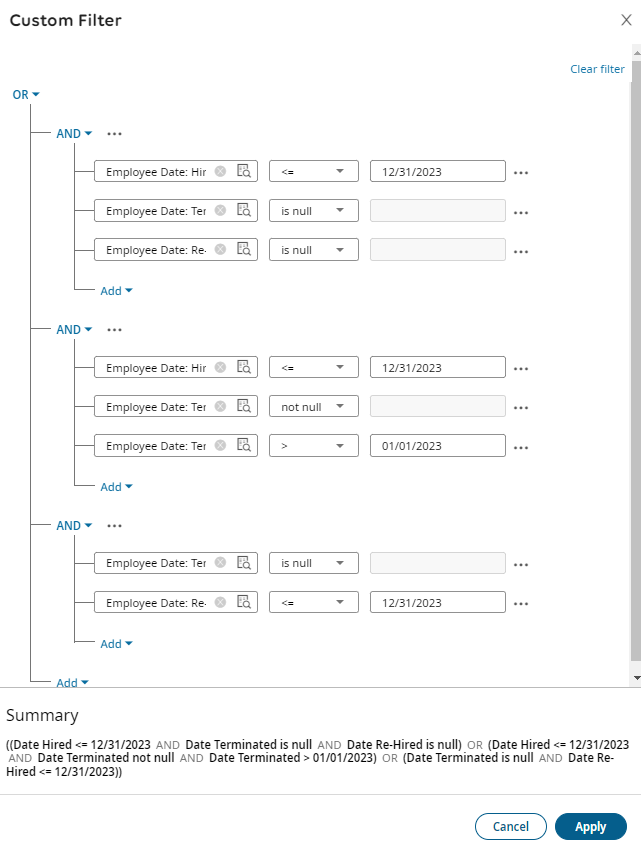
5. Continue configuring each of the three AND branches of the filter tree to it resembles the following image:

-
- Hire Date <= 12/31/2023
- Termination Date IS NULL
- Rehire Date is NULL
Second part if for Terminated Employees who were active in 2023- Hire Date <= 12/31/2023
- Term Date is NOT Null
- Termination Date > 01/01/2023
Third part is for Rehired employees who were active in 2023- Term Date IS NULL
- Rehire Date <= 12/31/2023
6. Click Apply on your filter and your report will show the employees that meet the criteria.
Note: You can add in columns for hired, re-hired and terminated dates to the screen view to confirm the data pulled.
Remember to save the report settings so it is available for the future. Click on the ellipsys and "save view as" and name your report.
